Sunday, March 17, 2013

Create Play Framework 2.0 web application in eclipse


As we added playframework 2 support in eclipse , let's start our first play 2 application

You must switch to Scala perspective


to add support for play template with scala code.


To run the Play framework, you need JDK 6 or later.
You can make sure by typing java and javac commands in the current path
(you can check this by typing java -version and javac -version at the shell prompt).

If these commands are not known by your command line, you can check this "How do I set or change the PATH system variable? tutorial" to set the JAVA_HOME environment variable.


Step1: Go to http://www.playframework.com/ and take the binary package from the download section
Download the latest Play binary package (the last version while I am writing is 2.1.0)
and extract the archive to a location where you have both read and write access because play writes some files to directories within the archive.

Set PLAY_HOME as environment variable and add it to your system PATH.

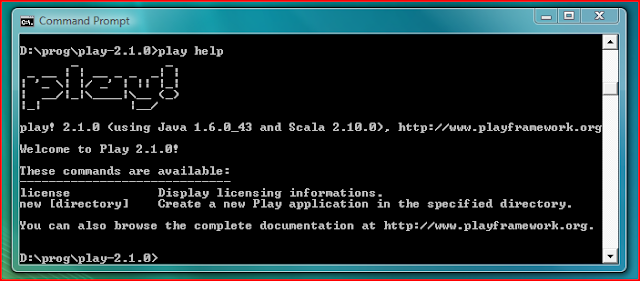
Step 2: Check that the play command is available

From the shell, launch the play -help command.


Step 3: Create a new application with the play command

It's very easy to create a new application, just with the "play new" command:
I chose "ecompass" as my application name

> play new ecompass


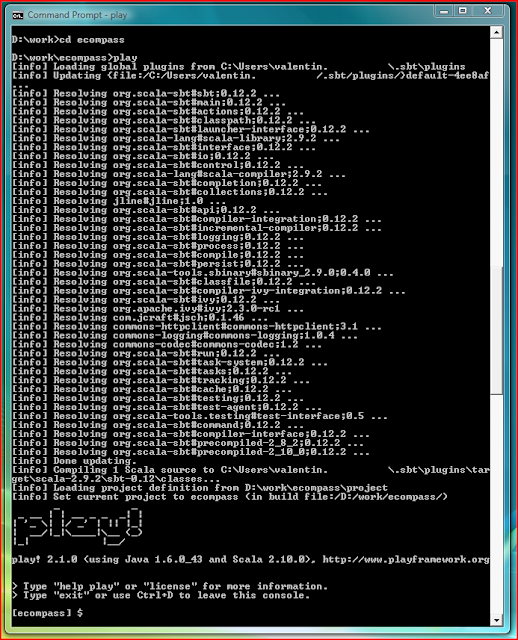
Once the application has been created you can use the play command again to enter the Play console .

> cd ecompass
> play


Now we can test our application and develop it with eclipse. While in the play console run "eclipse" command to create the project files, it would help us to import the project after.

[ecompass] $ eclipse


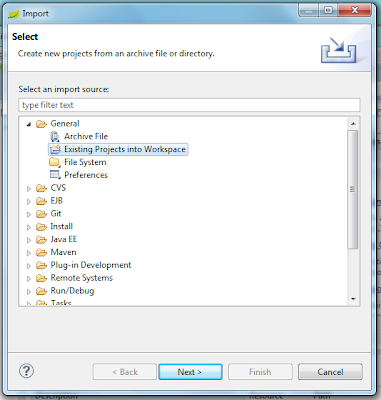
We'll import from eclipse the project


in "General" as "Existing Projects into Workspace" project


"Next > ", you have to "Select root directory" the location of the created project


and "Finish".


Step 4: Test the created application

- the Play console is a normal sbt console, so you can use sbt features such as triggered execution (note the included symbol tilde - "~") - (more about play console in another future blog post)

-  run the command "~run", this will enable the triggered compilation while a development server is running

[ecompass] $ ~run


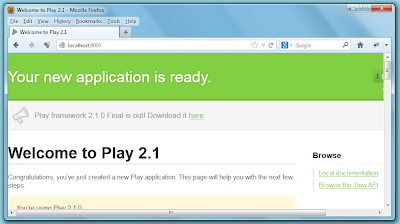
then browse the address http://localhost:9000/


Now let's test the hot-code reloading feature, modify the message in eclipse from our controller, in the index method, from "Your new application is ready." to "Hello Java World!".


save the file, you'll see in the command line that the Application.java class is compiled on the fly


and if you hit refresh on your browser you'll see the new message


cool, isn't it?

Step 5: A few more tweaks are required for integration:

- configure eclipse so changes made by play on the file system are automatically reloaded in eclipse (Window > Preferences > General > Workspace) check "Refresh using native hooks or polling";


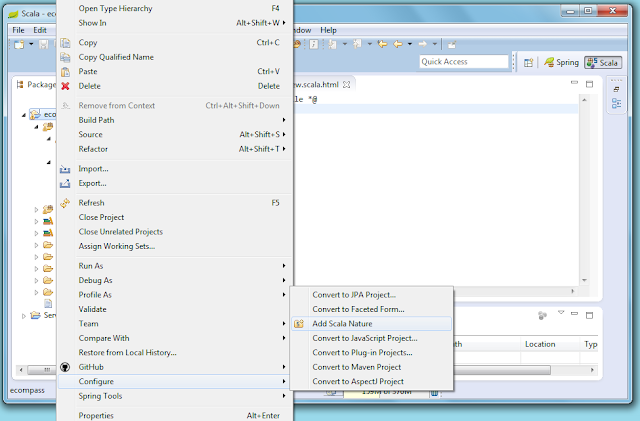
- to get scala code auto-complete in the play template we need to set the project with "Scala nature";


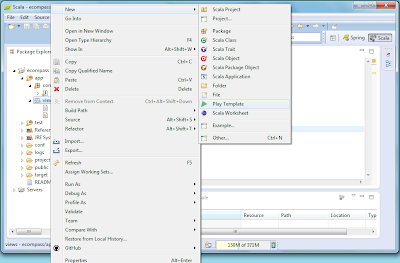
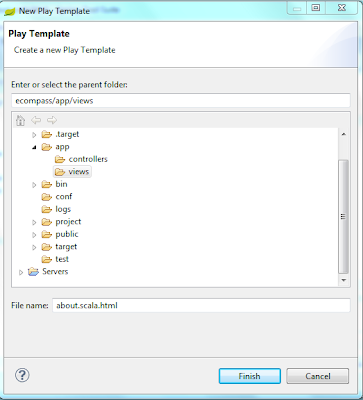
- create new play template;


this is how the created template looks, but we'll add some content


and  the file editor association (Window > Preferences > General > Editors > File Associations) and for ".html" extension we select the "Template Editor" and make it default;


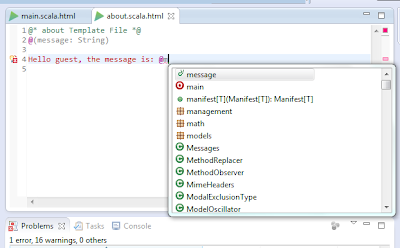
Now back to our new template we have syntax highlighting and auto-complete (content assist)


Back to our Application.java class, let's use the "about" template, the view (play template - about.scala.html) is recognized by eclipse


setting a "secret" message


and we'll see it when refreshing the browser.


Tips:
- be sure you have your workspace configured to work with UTF-8 encoding;


- to stop the running server you have to press "Ctrl + D" followed by "enter".

Saturday, March 16, 2013

Add Playframework 2 support in eclipse for building a Web Application


In this tutorial I'll add support for Playframework 2 in spring tool suite (IDE based on eclipse)

Supposing you have already the Spring Tool Suite. We'll install the Play2 plugin in our IDE.

Step 1: Install the Scala-IDE (this is required for play plugin) - http://scala-ide.org/index.html

We'll go in the wild side and select the version 3 release candidate. http://scala-ide.org/download/milestone.html#scala_ide_30_rc3

Go on Help > Install New Software...


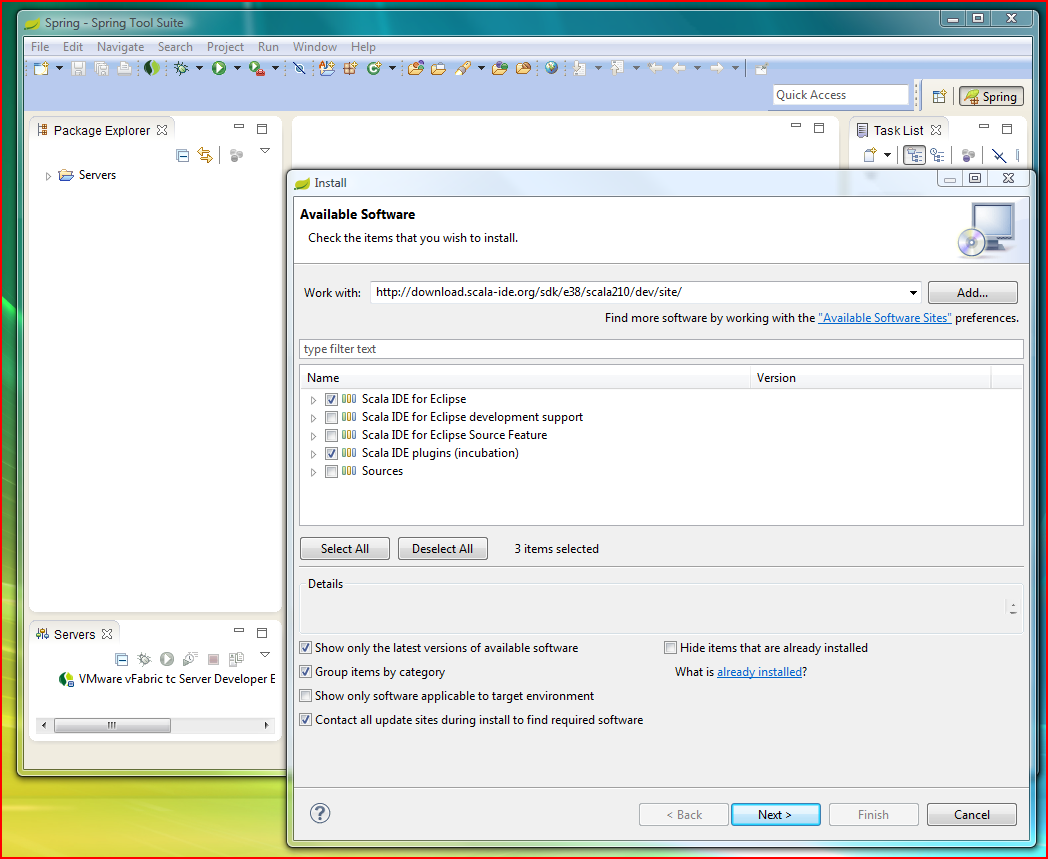
Put the link for the nightly build link at "Work with:" hit enter


check "Scala IDE for Eclipse" and "Scala IDE plugins (incubation)"


and hit "Next > "


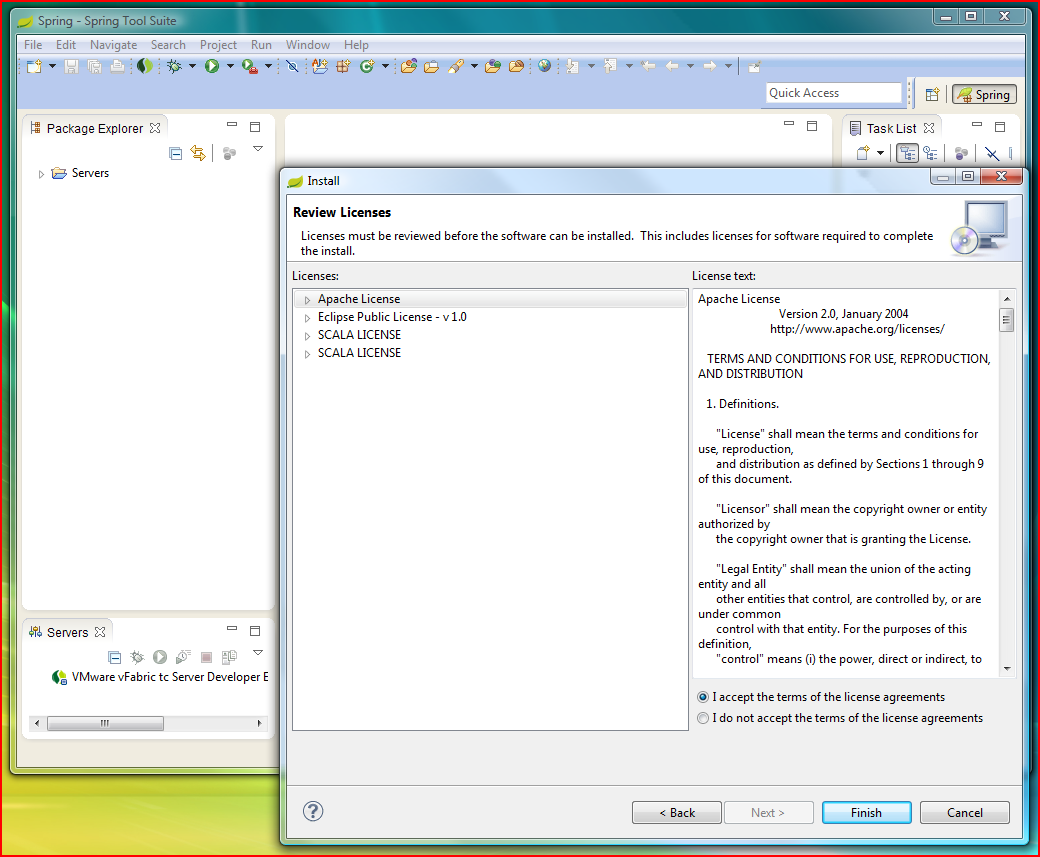
accept the license and press "Finish" and after a while, you'll receive a warning


hit ok and restart your IDE.

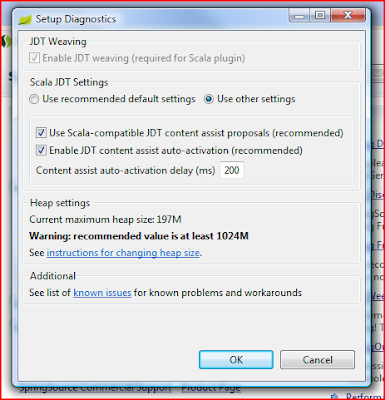
After restart a message would appear about "Scala Setup Diagnostics"


hit "Yes"


it's recommended to increase the heap for a proper functionality modifying the JVM arguments in STS.ini file with the following:
   -Xms512m
   -Xmx1024m .
For more details about tuning the performance on eclipse follow this discussion: http://stackoverflow.com/questions/142357/what-are-the-best-jvm-settings-for-eclipse .


Step 2: Install the Playframework 2 plugin

We'll use the nightly build as it has the latest features. http://download.scala-ide.org/play2/nightly_3.0-M_juno_2.10-M/site/
Or you can build your own version from sources that are on github: https://github.com/scala-ide/scala-ide-play2 .

Go on Help > Install New Software...

Put the link for the nightly build [link] at "Work with:" hit enter, check "Play 2 support"


 and hit "Next > "


"Next > "


accept the license and press "Finish".


Continue the installation when you receive the warning.

Now we can develop our first play application.

Friday, March 15, 2013

Spring Tool Suite Java IDE tutorial


Setting up Spring Tool Suite IDE tutorial (eclipse)

The SpringSource's developer team created a powerful IDE known as Spring Tool Suite or STS, which comes on top of the latest Eclipse IDE releases.
STS also includes the developer edition of vFrabic tc Server, the drop-in replacement for Apache Tomcat that's optimized for Spring.
Is a great tool even for developing your applications targeting local, virtual and cloud-based servers.
It is freely available for development and internal business operations use with no time limits.

Step 1: Getting Spring Tool Suite

Open your favorite web browser and go to the download page.
The last version while I am writing this tutorial is 3.2.0.RELEASE. For better performance choose the version based on Eclipse Juno 4.2.2.


Download the zip file, extract the folder, run the STS.exe, you'll be promted for setting the workspace.


after this you'll have a brand new IDE ready to use.


A few tweaks I use for this IDE are:
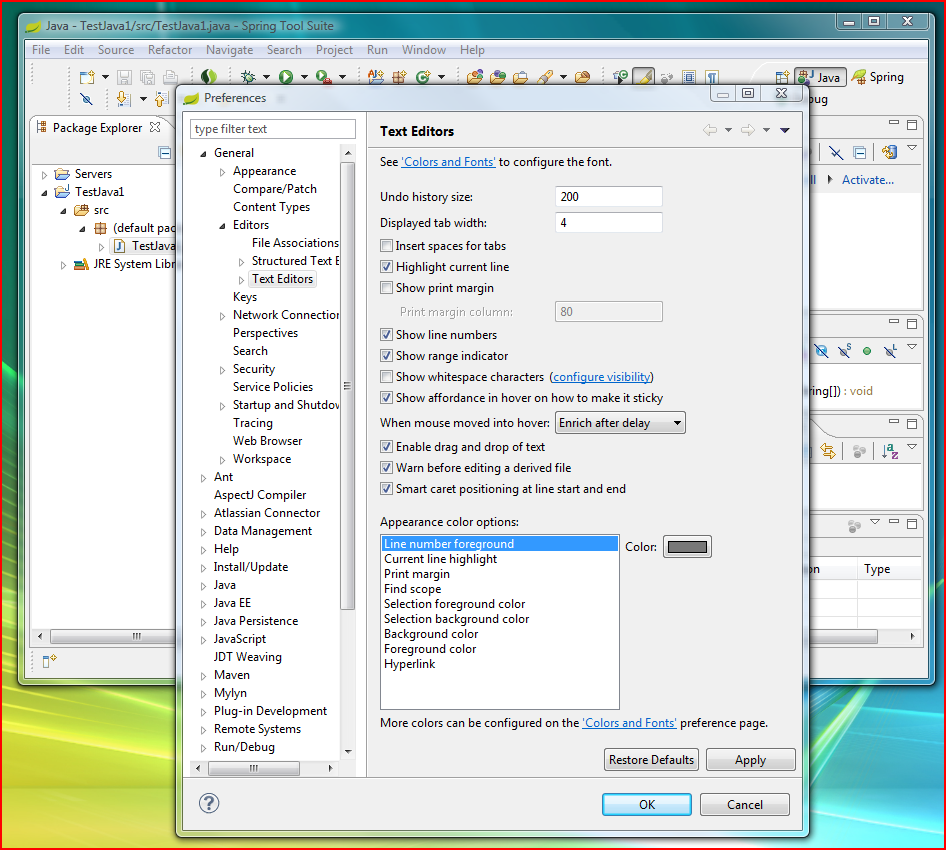
- show the line numbers (Window > Preferences > General > Editors > Text Editors and check "Show line numbers");


- show heap status (Window > Preferences > General > and check "Show heap status");


- and making sure you have an installed jre (Window > Preferences > General > Java > installed JREs);


if you don't have any JRE installed you can add a new one, click on ("Add..."), choose "Standard VM" in the next screen and "Next"


browse the "Directory..." and select the JDK folder


it will detect the jdk libraries and next "Finish".


Thursday, September 06, 2012

Java class loading mechanism

The default class loaders hierarchy of the JVM

- bootstrap class loader: loads Java's core classes, the java.* packages, the path is found on sun.boot.class.path sytem property, and usually it loads rt.jar and i18n.jar files, this classloader also loads the main class and all other classes that are referenced;

- extensions class loader: loads classes from the ext folder located in JAVA_HOME/jre/lib/ext, the path is found on java.ext.dirs system property;

- system class loader: loads classes that are available on paths specified by the system property java.class.path, the default value is the current directory, but you can change it by using the -classpath or -cp command-line options, or setting the CLASSPATH environment variable.
Delegation model
The class loaders are linked in a hierarchical structure. When asked to load a class, a class loader first asks its parent (class loader that loaded it) to load the class. If the parent can't load that class, the class loader would try to load it itself. If the parent succeeded, that class is returned to the class loader. On creation of a class loader instance, we can use it's constructor to set the parent.

When a class loader tries to load a class, it delegates to its parent and the parent does the same until the bootstrap class loader.

Role of the Thread context ClassLoader and how it can be used
The context ClassLoader is provided when creating the thread for use by code running in this thread when loading classes and resources.It was introduced in Java 1.2 to enable frameworks running in application servers to access the right class loader for loading application classes.

The need of context class loader came because of the visibility problem in classpath. For example, say that you have a server (Tomcat), the framework jar would need to be placed in WEB-INF/lib and not on the system class path or in a server class path such as TOMCAT_HOME/common/lib.
The process of loading classes with Class.forName() Create an instance of the class by invoking the class.newInstance() method on the class object after dynamic loading.

Example:
String className = "ro.blogspot.UserDao";
Class cls = Class.forName(className);
UserDao userDao = (UserDao)cls.newInstance();
List users = userDao.getAllUsers();


Java serialization mechanisms

In Java we can create reusable objects in memory, but they have a limited life, as long the Java virtual machine remains running.

Java serialization is a mechanism where an object's state can be saved as a sequence of bytes that have the object's data and information about the objects's type and the types of data stored in the object and can later be fully restored to regenerate the original object. You can use object serialization on any object that implements the java.io.Serializable or the java.io.Externalizable interface.

The Serializable interface is just a marker interface (it has no methods or fields). Transient keyword is a modifier applied to fields (like time elapsed or logger) that are not part of the persistent state of the object and thus never saved during serialization.


Example:
import java.io.Serializable;

public class PersistentObject implements Serializable {
  String name = "DefaultName";
}


import java.io.FileOutputStream;
import java.io.IOException;
import java.io.ObjectOutputStream;


public class MainClass {

  public static void main(String[] args) {
    String filename = "persistentObject.ser";
    PersistentObject persistentObject = new PersistentObject();
    FileOutputStream fos = null;
    ObjectOutputStream out = null;
    try {
      fos = new FileOutputStream(filename);
      out = new ObjectOutputStream(fos);
      out.writeObject(persistentObject);
    }
    catch (IOException ex) {
      System.out.println("couldn't serialize");
    }
    finally {
      if (out != null) {
        try {
          out.close();
        }
        catch (IOException e) {
          System.out.println("couldn't close the object output stream");
        }
      }
    }
  }
}

and the content of persistenObject.ser file viewed with a HEX editor is

where you can see the type of my field as java.lang.String and the value and now if I make the field name transient it won't be saved in my file.
 transient String name = "DefaultName";

This is how we read a serializable object from a file:


import java.io.*;


public class MainClass {

  public static void main(String[] args) {
    String filename = "persistentObject.ser";
    PersistentObject persistentObject = null;
    FileInputStream fis = null;
    ObjectInputStream in = null;
    try {
      fis = new FileInputStream(filename);
      in = new ObjectInputStream(fis);
      persistentObject = (PersistentObject) in.readObject();
    }
    catch (IOException ex) {
      System.out.println("couldn't read the object");
    }
    catch (ClassNotFoundException ex) {
      System.out.println("couldn't the class to cast the object from the file: " + filename);
    }
    finally {
      if (in != null) {
        try {
          in.close();
        }
        catch (IOException e) {
          System.out.println("couldn't close the input stream);
        }
      }
    }
    System.out.println("value from object is: " + persistentObject.name);
  }
}

and after running this application we'll see in console: "value from object is: DefaultName".

In case there is a graph and has an object that does not support the Serializable interface a NotSerializableException will be thrown and will identify the class of the non-serializable object.

Example:
Having an animal class which doesn't implement the java.io.Serializable interface

public class Animal {
    private String name;
    public String getName() {
        return name;
    }
    public Animal(String name) {
        this.name = name;
    }
}

and the same persistence object that includes an instance of animal

import java.io.Serializable;
public class PersistentObject implements Serializable {
    String name = "DefaultName";
    Animal testAnimal = new Animal("Test");
}

If we try to write an object of type PersistentObject again
import java.io.FileOutputStream;
import java.io.IOException;
import java.io.ObjectOutputStream;


public class MainClass {

  public static void main(String[] args) {
    String filename = "persistentObject.ser";
    PersistentObject persistentObject = new PersistentObject();
    FileOutputStream fos = null;
    ObjectOutputStream out = null;
    try {
      fos = new FileOutputStream(filename);
      out = new ObjectOutputStream(fos);
      out.writeObject(persistentObject);
    }
    catch (IOException ex) {
      System.out.println("couldn't serialize");
    }
    finally {
      if (out != null) {
        try {
          out.close();
        }
        catch (IOException e) {
          System.out.println("couldn't close the object output stream");
        }
      }
    }
  }
}

we'll get the following stacktrace

java.io.NotSerializableException: ro.blogspot.valentinjava.Animal
at java.io.ObjectOutputStream.writeObject0(ObjectOutputStream.java:1164)
at java.io.ObjectOutputStream.defaultWriteFields(ObjectOutputStream.java:1518)
at java.io.ObjectOutputStream.writeSerialData(ObjectOutputStream.java:1483)
at java.io.ObjectOutputStream.writeOrdinaryObject(ObjectOutputStream.java:1400)
at java.io.ObjectOutputStream.writeObject0(ObjectOutputStream.java:1158)
at java.io.ObjectOutputStream.writeObject(ObjectOutputStream.java:330)
at ro.blogspot.valentinjava.MainClass.main(MainClass.java:46)
at sun.reflect.NativeMethodAccessorImpl.invoke0(Native Method)
at sun.reflect.NativeMethodAccessorImpl.invoke(NativeMethodAccessorImpl.java:39)...

and the written object can't be read.

The serialization mechanism can be customized with the help of  the java.io.Externalizable  interface white has two methods writeExternal(ObjectOutput out) method to save the state of the object and readExternal(ObjectInput in) method to read the data written by the writeExternal method from the stream and restore the state of the object.

Each class is good to have a serial version number, that is used to identify the original class version which it can be used of writing streams and from which it can be read. For example, a class must have:

 private static final long serialVersionUID = -8997273866406805568L;
and this number is a 64-bit hash of the class name, interface class names, methods, and fields. As a remark for dynamic proxy classes and enum types the serial version number is always 0L.

If you want to deserialize a class which was serialized with a different serialVersionUID you'll get an Exception in thread "main" java.io.InvalidClassException.